Enclosure UV Printing Service
CURRENT WAIT TIME IS 12 BUSINESS DAYS FOR COLOR ENCLOSURES, WORKSHOP IS OVERLOADED
PLEASE READ THIS PAGE UNTIL THE END.
-Here is link https://drill.taydakits.com/dashboard where you can save your uv templates, drill templates and then attach to them your order using Create Job button, you will see create job button only after you place an order. In single order you can have several different uv prints, drill templates and different color enclosures. You can assign which template for which enclosure etc. from your Tayda Box Tool dashboard for that order. Also you can monitor your order drill status or uv printing status from Tayda Box Tool dashboard, and it will show alert message if we were able detect any problem with your file before drill or print and you can take action to fix your file so your order shipment doesn't delay. It is always good to keep an eye on your order status in your Tayda Box Tool dashboard after placing order. If there is some problem, we will put note in there, we won't email.
!!! For customers who try to use Affinity Designer software instead of AI Adobe Illustrator please read !!!
-If you wish you can use it but WE DON'T SUPPORT "Affinity Designer" software because most people can't make it work and files print either very wrong size or white and gloss spot colors are incorrect. Yes some people make it work but most not. Use it at your own risk! We will print it but we won't accept liability. We recommend Adobe Illustrator software.
- You can find uv printing service ordering links bottom of this page but first PLEASE read ALL the instructions in here carefully. We try to cover everything in here. Please note that when you send us your file we can't edit it, it will be printed as it is and we won't take any responsibility even though file had very obvious mistake or very visible mistake. In last few months we been spending so much time on fixing customers files and it is very expensive labor work. So we inform you from here that we are not going to retouch your files and print as it is. Please don't blame us if your file wasn't prepared uv printing friendly.
Let's start;
-Please make sure everything in your artwork is VECTORIZED otherwise your print will not look nice at all. You can't just save image as PDF and then send it to us to get uv printed, it doesn't work that way, it must be first vectorized in software, we recommend using Adobe Illustrator. Please please vectorize everything on your artwork.
-When you are preparing your artwork, in your software please make sure to create correct size artboard to put your artwork in it. Here are artboard sizes we require for enclosure types,
1590B type enclosure AI format template CLICK HERE (artboard size 56 x 108.50mm)
1590B type enclosure PDF format template CLICK HERE (artboard size 56 x 108.50mm)
125B type enclosure AI format template CLICK HERE (artboard size 62 x 117mm)
125B type enclosure PDF format template CLICK HERE (artboard size 62 x 117mm)
1590BB type enclosure AI format template CLICK HERE (artboard size 90 x 115.50mm)
1590BB type enclosure PDF format template CLICK HERE (artboard size 90 x 115.50mm)
1590BB2 type enclosure AI format template CLICK HERE (artboard size 90 x 115.50mm)
1590BB2 type enclosure PDF format template CLICK HERE (artboard size 90 x 115.50mm)
1590XX type enclosure AI format template CLICK HERE (artboard size 117 x 141mm)
1590XX type enclosure PDF format template CLICK HERE (artboard size 117 x 141mm)
1590A type enclosure AI format template CLICK HERE (artboard size 35 x 89mm)
1590A type enclosure PDF format template CLICK HERE (artboard size 35 x 89mm)
1590DD type enclosure AI format template CLICK HERE (artboard size 117 x 185mm)
1590DD type enclosure PDF format template CLICK HERE (artboard size 117 x 185mm)
-When you put your artwork on artboard please make sure to center allign your artwork evenly on artboard so gaps on sides are equal.
-Please create your artwork with CMYK (not RGB)
-We can't print in GOLD and SILVER colors and it's tones.
IMPORTANT
-In your software please create layers like this and in the same order like this,
machine prints from bottom layer to top, so prints white color things first (from white layer), then prints any other color (color layer) and finally prints gloss or matte layer. Printer goes through each layer only 1 time.
-GLOSS-V or GLOSS-M
-COLOR
-WHITE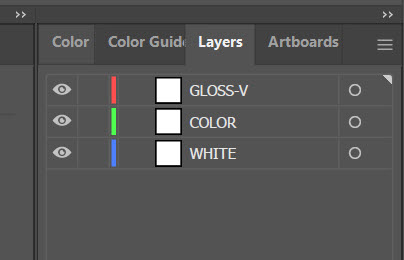
In your file please have only these layers and nothing else.
Now explanation of layers,
1- Create layer named "WHITE" , If you have anything on your artwork that needs to be printed in WHITE please put that part of your artwork in to this layer. If you don't have anything in white then you can ignore this layer. PLEASE NOTE THAT PRINTING IN COLORS LIKE TONES OF CREAM, GRAY, OR OTHER TONES OF WHITE will all require you to create white undercoat in white layer otherwise these colors (tones of cream, gray, white etc) will not be printed perfect or they won't be visible well on final product. Everything in WHITE layer must be painted with RDG_WHITE paint using ROLAND SWATCH, NOT normal white paint, it must be RDG_WHITE, when you use this paint whatever you paint will look greyish color instead of white, no worries, printer will still print it white, greyish color is just computer code to tell printer open white ink on those areas.
**Some customers trying to match / compensate / convert RDG_WHITE grayish color with CMYK values, this won't work at all, RDG_WHITE is spot color, not CMYK, trying to convert it to CMYK will not work and waste your time and money, printing result can be very wrong. Please use only RDG_WHITE from Roland Versaworks Swatch.
You can import ROLAND SWATCH to your Adobe Illustrator using below link
https://www.taydaelectronics.
Once you import it to your AI it will look like below image, you will need to use "RDG_WHITE" paint
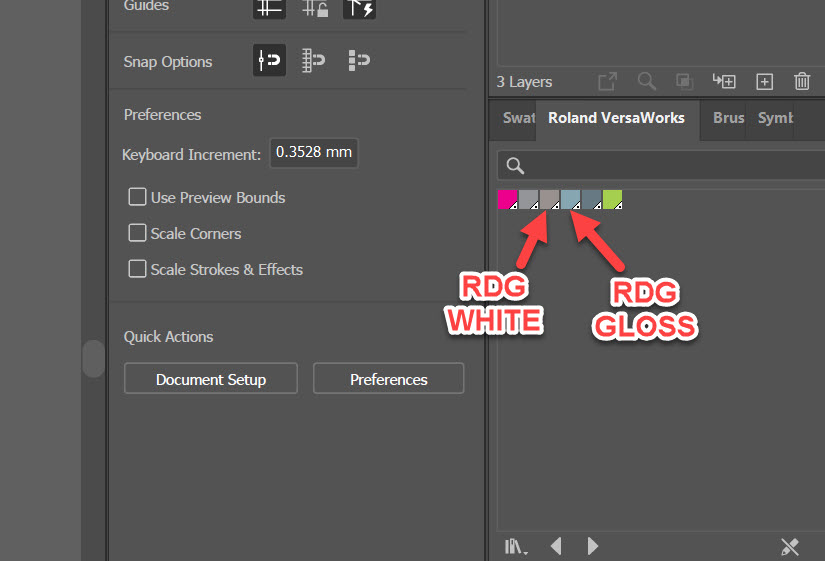
2- Create layer named "COLOR" , please put everything in your artwork that will be printed in any color EXCEPT white color. White color goes to WHITE layer.
**if you put same data on both, white and color layers, it will be both get printed on top of each other.
***THERE ARE 2 IMPORTANT THINGS IN COLOR LAYER,
- Very important!! DIFFERENT COLOR THINGS OVERLAPPING EACH OTHER IN COLOR LAYER, LET'S SAY YOU HAVE A BLUE CAT ON RED HOUSE, LET'S SAY CAT IS OVERLAPPING ON HOUSE, YOU NEED TO REMOVE PART OF HOUSE THAT CAT OVERLAPPING, IT IS EASY IN ADOBE ILLUSTRATOR, JUST SELECT AND CAT AND HOUSE AND UNDER PATHFINDER SECTION CLICK MERGE AND SOFTWARE WILL DO THE JOB FOR YOU AND REMOVE ANYTHING FROM BACKGROUND OF CAT. IN OTHER WORDS, IN COLOR LAYER, OVERLAPPING DIFFERENT COLOR THINGS ARE NOT ALLOWED. (EXCEPT WHITE AND COLOR IS OVERLAPPING, THIS IS ALLOWED AND SOMETIMES IT IS NECESSARY)
-Very important!!, printing dark color things on dark color enclosure will not work well unless you create white undercoat for it. Let's say you want to print a blue color cat on black color enclosure, you must create a copy of that cat in white layer and paint it with rdg_white otherwise that cat will not be visible on black enclosure. While on your computer screen you can, in real world dark things on dark background disappear, so you must use white undercoat or underlayer technique to make that dark thing visible. You can do this by creating copy of blue cat in white layer also and get it painted with rdg_white and you still have the cat in blue color in color layer also. Printed always print white layer first and then prints any other color and then finally prints gloss or matte (if available), so machine will first print white copy of that blue cat which painted with rdg_white in white layer and then it will print blue cat from color layer on top of white one so you will have very visible cat. Please see below example,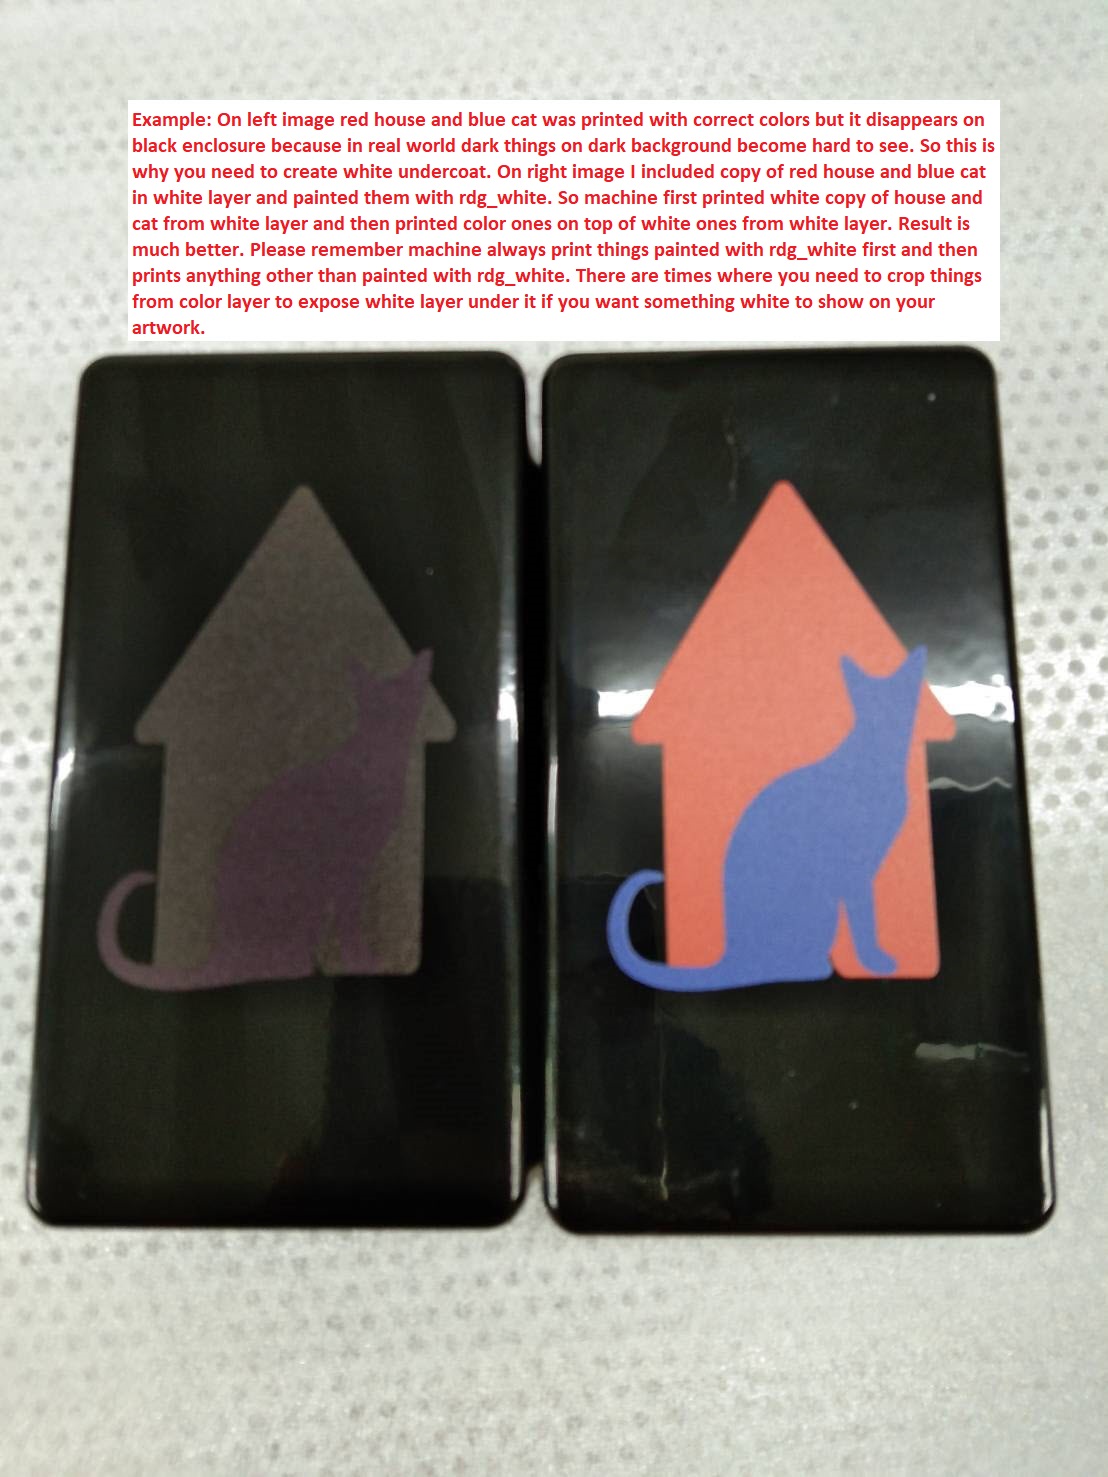
And here is the link for AI file for this cat and house sample CLICK HERE
3- Create layer named "GLOSS-V" or "GLOSS-M" , if you need your artwork or part of your artwork get gloss varnished (glossy look), or gloss matte (matte look) , if you need any of these options then you need to create one of these layers, if you don't need then you can ignore this layer. Please note gloss-v and gloss-m layer has additinal service fee ranging from $2 to $5. For Gloss, you need to use RDG_GLOSS paint from Roland Swatch to paint everything in your gloss-v or gloss-m layer.
***If you need gloss / matte printing you need to buy "ADDITIONAL SERVICE FOR GLOSS LAYER ENCLOSURE CUSTOM UV PRINTING SERVICE" product at the same quantity of enclosures you want to get gloss / matte printed, on top of normal uv printing service you will buy. So if you have gloss / matte print, that means you need to buy regular uv print service + additional service for gloss layer.
Here is example UV printing file we made for 125B enclosure size with Adobe Illustrator,
EXAMPLE FILE PDF FORMAT CLICK HERE
EXAMPLE FILE AI FORMAT CLICK HERE
In this example file you can see that we created 3 layers, in "COLOR" layer we put everything that need to be printed that is not white color and also we always create invisible strokeless rectangular border at the same size of enclosure size we describe below, in "WHITE" layer we put "Y" letter from Tayda name because we want "Y"letter to be in white color and in "GLOSS-V" layer we put "Y" and "D" letter of Tayda because after printing these letters in color we want our machine to print gloss varnish clear ink on these 2 letters. So this is why "D" letter exists in COLOR layer and also in GLOSS-V layer and this is why "Y" letter exists in WHITE layer and also in GLOSS-V layer.
-PLEASE MAKE SURE EVERYTHING IN YOUR ARTWORK IS VECTORIZED, INCLUDING TEXTS, IN ADOBE ILLUSTRATOR YOU CAN VECTORIZE TEXTS BY CLICKING "CREATE OUTLINES" IN PROPERTIES SECTION.
-PLEASE MAKE SURE YOUR ARTWORK IS NOT BIGGER THAN YOUR ARTBOARD AND THERE IS ABSOLUTELY NOTHNING OUTSIDE ARTBOARD BOARDERS.
-ON YOUR ARTBOARD, PLEASE DON'T MAKE BACKGROUND OF YOUR ARTWORK IN ENCLOSURE COLOR, OTHERWISE IT WILL GET PRINTED ALSO.
PLEASE PUT ONLY PRINTABLE DATA ON YOUR ARTWORK LAYERS,
-
 ENCLOSURE MASKING SERVICEMASKING SERVICE IS TO PROTECT FROM PAINT GOING INSIDE OF ENCLOSURE DURING POWDER COATING AND ALSO IT PROTECTS PAINT GOING INSIDE THE SCREW HOLES. | !!! IF CUSTOMER ORDER THIS SERVICE THE QUANTITY OF THIS SERVICE MUST MATCH THE ALL QUANTITY OF ENCLOSURES IN THAT ORDER, CAN NOT BUY FOR PARTIAL QUANTITY.!!!Tayda Electronics - Get It Fast - Same Day ShippingSKU: A-9999-TAPE-V1 | Qty Available: 398332$1.00 As low as $0.70Buy 10 : $0.90 Buy 50 : $0.80
 -
 ADDITIONAL SERVICE FOR PRINTING WHITE LAYER TWICEFOR NORMAL UV PRINTING YOU DON'T NEED TO ORDER THIS. THIS IS EXTRA SERVICE FOR CUSTOMER WHO WANT THEIR WHITE LAYER PRINTED TWICETayda Electronics - Get It Fast - Same Day ShippingSKU: A-99999-CST-UV-WH | Qty Available: 398602$2.00 As low as $1.00Buy 10 : $1.50 Buy 50 : $1.00
 -
 ADDITIONAL SERVICE FOR GLOSS LAYER ENCLOSURE CUSTOM UV PRINTING SERVICETayda Electronics - Get It Fast - Same Day ShippingSKU: A-99999-CST-UV-GL | Qty Available: 398384$2.00 As low as $1.00Buy 10 : $1.50 Buy 50 : $1.00
 -
 125B ENCLOSURE FACE UV PRINTING SERVICE125B Type Enclosure | 7 - 10 business daysTayda Electronics - Get It Fast - Same Day ShippingSKU: A-5165-CST-UV1 | Qty Available: 398335$4.00 As low as $2.00Buy 5 : $3.50 Buy 10 : $3.00
 -
 1590B ENCLOSURE FACE UV PRINTING SERVICE1590B Type Enclosure | 7 - 10 business daysTayda Electronics - Get It Fast - Same Day ShippingSKU: A-5158-CST-UV1 | Qty Available: 398641$4.00 As low as $2.00Buy 5 : $3.50 Buy 10 : $3.00
 -
 1590BB ENCLOSURE FACE UV PRINTING SERVICE1590BB Type Enclosure | 7 - 10 business daysTayda Electronics - Get It Fast - Same Day ShippingSKU: A-5164-CST-UV1 | Qty Available: 398680$4.00 As low as $2.00Buy 5 : $3.50 Buy 10 : $3.00
 -
 1590BB2 ENCLOSURE FACE UV PRINTING SERVICE1590BB2 Type Enclosure | 7 - 10 business daysTayda Electronics - Get It Fast - Same Day ShippingSKU: A-5969-CST-UV1 | Qty Available: 398740$4.00 As low as $2.00Buy 5 : $3.50 Buy 10 : $3.00
 -
 1590A ENCLOSURE FACE UV PRINTING SERVICE1590A Type Enclosure | 7 - 10 business daysTayda Electronics - Get It Fast - Same Day ShippingSKU: A-5163-CST-UV1 | Qty Available: 398656$4.00 As low as $2.00Buy 5 : $3.50 Buy 10 : $3.00
 -
 1590XX ENCLOSURE FACE UV PRINTING SERVICE1590XX Type Enclosure | 7 - 10 business daysTayda Electronics - Get It Fast - Same Day ShippingSKU: A-5161-CST-UV1 | Qty Available: 398821$4.00 As low as $2.00Buy 5 : $3.50 Buy 10 : $3.00
 -
 1590DD ENCLOSURE FACE UV PRINTING SERVICE1590DD Type Enclosure | 7 - 10 business daysTayda Electronics - Get It Fast - Same Day ShippingSKU: A-5141-CST-UV | Qty Available: 398817$4.00 As low as $2.00Buy 5 : $3.50 Buy 10 : $3.00
 -
 125B ENCLOSURE LID UV PRINTING SERVICETHIS IS FOR PRINTING ON LID !!! | 125B Type Enclosure | 7 - 10 business daysTayda Electronics - Get It Fast - Same Day ShippingSKU: A-5165-CST-UVL | Qty Available: 398885$3.00 As low as $2.00Buy 10 : $2.50 Buy 50 : $2.00
 -
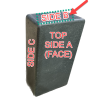 125B ENCLOSURE SIDE B UV PRINTING SERVICETHIS IS FOR PRINTING ON SIDE B !!! | ARTBOARD SIZE 57mm X 33mm | 125B Type Enclosure | 7 - 10 business daysTayda Electronics - Get It Fast - Same Day ShippingSKU: A-5165-CST-UVB | Qty Available: 398868$3.00 As low as $2.00Buy 10 : $2.50 Buy 50 : $2.00
 -
 125B ENCLOSURE SIDE C UV PRINTING SERVICETHIS IS FOR PRINTING ON SIDE C !!! | ARTBOARD SIZE 33mm X 111mm | 125B Type Enclosure | 7 - 10 business daysTayda Electronics - Get It Fast - Same Day ShippingSKU: A-5165-CST-UVC | Qty Available: 398860$3.00 As low as $2.00Buy 10 : $2.50 Buy 50 : $2.00
 -
 125B ENCLOSURE SIDE D UV PRINTING SERVICETHIS IS FOR PRINTING ON SIDE D !!! | ARTBOARD SIZE 57mm X 33mm | 125B Type Enclosure | 7 - 10 business daysTayda Electronics - Get It Fast - Same Day ShippingSKU: A-5165-CST-UVD | Qty Available: 398812$3.00 As low as $2.00Buy 10 : $2.50 Buy 50 : $2.00
 -
 125B ENCLOSURE SIDE E UV PRINTING SERVICETHIS IS FOR PRINTING ON SIDE E !!! | ARTBOARD SIZE 33mm X 111mm | 125B Type Enclosure | 7 - 10 business daysTayda Electronics - Get It Fast - Same Day ShippingSKU: A-5165-CST-UVE | Qty Available: 398838$3.00 As low as $2.00Buy 10 : $2.50 Buy 50 : $2.00
 -
 1590BB ENCLOSURE LID UV PRINTING SERVICETHIS IS FOR PRINTING ON LID !!! | 1590BB Type Enclosure | 7 - 10 business daysTayda Electronics - Get It Fast - Same Day ShippingSKU: A-5164-CST-UVL | Qty Available: 398888$3.00 As low as $2.00Buy 10 : $2.50 Buy 50 : $2.00
 -
 1590BB ENCLOSURE SIDE B UV PRINTING SERVICETHIS IS FOR PRINTING ON SIDE B !!! | ARTBOARD SIZE 84mm X 29mm | 1590BB Type Enclosure | 7 - 10 business daysTayda Electronics - Get It Fast - Same Day ShippingSKU: A-5164-CST-UVB | Qty Available: 398888$3.00 As low as $2.00Buy 10 : $2.50 Buy 50 : $2.00
 -
 1590BB ENCLOSURE SIDE C UV PRINTING SERVICETHIS IS FOR PRINTING ON SIDE C !!! | ARTBOARD SIZE 29mm X 110mm | 1590BB Type Enclosure | 7 - 10 business daysTayda Electronics - Get It Fast - Same Day ShippingSKU: A-5164-CST-UVC | Qty Available: 398888$3.00 As low as $2.00Buy 10 : $2.50 Buy 50 : $2.00
 -
 1590BB ENCLOSURE SIDE D UV PRINTING SERVICETHIS IS FOR PRINTING ON SIDE D !!! | ARTBOARD SIZE 84mm X 29mm | 1590BB Type Enclosure | 7 - 10 business daysTayda Electronics - Get It Fast - Same Day ShippingSKU: A-5164-CST-UVD | Qty Available: 398886$3.00 As low as $2.00Buy 10 : $2.50 Buy 50 : $2.00
 -
 1590BB ENCLOSURE SIDE E UV PRINTING SERVICETHIS IS FOR PRINTING ON SIDE E !!! | ARTBOARD SIZE 29mm X 110mm | 1590BB Type Enclosure | 7 - 10 business daysTayda Electronics - Get It Fast - Same Day ShippingSKU: A-5164-CST-UVE | Qty Available: 398888$3.00 As low as $2.00Buy 10 : $2.50 Buy 50 : $2.00
 -
 1590B ENCLOSURE LID UV PRINTING SERVICETHIS IS FOR PRINTING ON LID !!! | 1590B Type Enclosure | 7 - 10 business daysTayda Electronics - Get It Fast - Same Day ShippingSKU: A-5158-CST-UVL | Qty Available: 398888$3.00 As low as $2.00Buy 10 : $2.50 Buy 50 : $2.00
 -
 1590B ENCLOSURE SIDE B UV PRINTING SERVICETHIS IS FOR PRINTING ON SIDE B !!! | ARTBOARD SIZE 52mm X 24mm | 1590B Type Enclosure | 7 - 10 business daysTayda Electronics - Get It Fast - Same Day ShippingSKU: A-5158-CST-UVB | Qty Available: 398888$3.00 As low as $2.00Buy 10 : $2.50 Buy 50 : $2.00
 -
 1590B ENCLOSURE SIDE C UV PRINTING SERVICETHIS IS FOR PRINTING ON SIDE C !!! | ARTBOARD SIZE 24mm X 103mm | 1590B Type Enclosure | 7 - 10 business daysTayda Electronics - Get It Fast - Same Day ShippingSKU: A-5158-CST-UVC | Qty Available: 398883$3.00 As low as $2.00Buy 10 : $2.50 Buy 50 : $2.00
 -
 1590B ENCLOSURE SIDE D UV PRINTING SERVICETHIS IS FOR PRINTING ON SIDE D !!! | ARTBOARD SIZE 52mm X 24mm | 1590B Type Enclosure | 7 - 10 business daysTayda Electronics - Get It Fast - Same Day ShippingSKU: A-5158-CST-UVD | Qty Available: 398887$3.00 As low as $2.00Buy 10 : $2.50 Buy 50 : $2.00
 -
 1590B ENCLOSURE SIDE E UV PRINTING SERVICETHIS IS FOR PRINTING ON SIDE E !!! | ARTBOARD SIZE 24mm X 103mm | 1590B Type Enclosure | 7 - 10 business daysTayda Electronics - Get It Fast - Same Day ShippingSKU: A-5158-CST-UVE | Qty Available: 398883$3.00 As low as $2.00Buy 10 : $2.50 Buy 50 : $2.00
 -
 1590BB2 ENCLOSURE SIDE B UV PRINTING SERVICETHIS IS FOR PRINTING ON SIDE B !!! | ARTBOARD SIZE 84mm X 32mm | 1590BB2 Type Enclosure | 7 - 10 business daysTayda Electronics - Get It Fast - Same Day ShippingSKU: A-5969-CST-UVB | Qty Available: 398887$3.00 As low as $2.00Buy 10 : $2.50 Buy 50 : $2.00
 -
 1590BB2 ENCLOSURE SIDE C UV PRINTING SERVICETHIS IS FOR PRINTING ON SIDE C !!! | ARTBOARD SIZE 32mm X 110mm | 1590BB2 Type Enclosure | 7 - 10 business daysTayda Electronics - Get It Fast - Same Day ShippingSKU: A-5969-CST-UVC | Qty Available: 398887$3.00 As low as $2.00Buy 10 : $2.50 Buy 50 : $2.00
 -
 1590BB2 ENCLOSURE SIDE D UV PRINTING SERVICETHIS IS FOR PRINTING ON SIDE D !!! | ARTBOARD SIZE 84mm X 32mm | 1590BB2 Type Enclosure | 7 - 10 business daysTayda Electronics - Get It Fast - Same Day ShippingSKU: A-5969-CST-UVD | Qty Available: 398884$3.00 As low as $2.00Buy 10 : $2.50 Buy 50 : $2.00
 -
 1590BB2 ENCLOSURE SIDE E UV PRINTING SERVICETHIS IS FOR PRINTING ON SIDE E !!! | ARTBOARD SIZE 32mm X 110mm | 1590BB2 Type Enclosure | 7 - 10 business daysTayda Electronics - Get It Fast - Same Day ShippingSKU: A-5969-CST-UVE | Qty Available: 398887$3.00 As low as $2.00Buy 10 : $2.50 Buy 50 : $2.00
 -
 1590BB2 ENCLOSURE LID UV PRINTING SERVICETHIS IS FOR PRINTING ON LID !!! | ARTBOARD SIZE 90mm X 115.50mm | 1590BB2 Type Enclosure | 7 - 10 business daysTayda Electronics - Get It Fast - Same Day ShippingSKU: A-5969-CST-UVL | Qty Available: 398888$3.00 As low as $2.00Buy 10 : $2.50 Buy 50 : $2.00

